
Azure Stack Development Kit (ASDK 1808) Installation Steps
- Rohit Anand
- Oct 1, 2018
- 6 min read
In this series of documentation, will be completing ASDK 1808 installation steps. I can say its 28 easy steps to install ASDK.
Before you start to deploy Azure Stack Development Kit, Your host machine should meet below Hardware requirement:
Refer below Microsoft article for reference:

Please use below URL to download ASDK
Now its time to prepare your host machine
1. Sing In as Local Administrator account to your local host machine.
2. Once you will extract ASDK 1808, Please check Cloudbuilder.vhdx file has been moved to C: drive.
3. Open Windows PowerShell ISE (Run as Administrator) and run the below script
# Variables
$Uri = 'https://raw.githubusercontent.com/Azure/AzureStack-Tools/master/Deployment/asdk-installer.ps1'
$LocalPath = 'C:\AzureStack_Installer'
# Create folder
New-Item $LocalPath -Type directory
# Enforce usage of TLSv1.2 to download from GitHub
[Net.ServicePointManager]::SecurityProtocol = [Net.SecurityProtocolType]::Tls12
# Download file
Invoke-WebRequest $uri -OutFile ($LocalPath + '\' + 'asdk-installer.ps1')

Note: This command will download asdk-installer.ps1 to the C:\AzureStack_ Installer Folder.
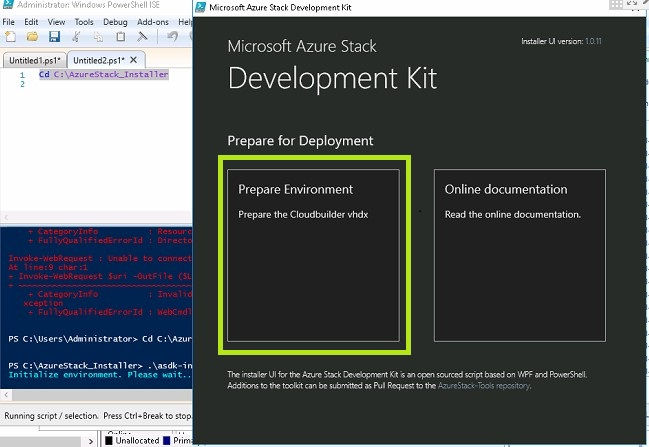
4. Once the file will get downloaded at the specified folder, please execute below command in Windows PowerShell ISE (Run as Administrator).
Cd c:\AzureStack_Installer
.\asdk-installer.ps1
As soon as you will execute, "Prepare for Deployment" page will get popup.
Please select "Prepare Environment" (Green Highlighted)
5. Next Step, it will take you to "Select Cloudbuilder Vhdx" page and need to provide the path for Cloudbuilder.vhdx
Browse--> C:\AzureStackDevelopmentkit\Cloudbuilder.vhdx --> Next

6. Next step, it will take you to "Optional Settings" page and configure below option:
-Configure Local Admin Account
You can provide the local administrator account credentials
-Computer Name
This option sets the name for the development kit host. The name must comply with FQDN requirements and must be 15 characters or less in length. The default is a random computer name generated by Windows.
-Static IP Configuration
Sets your deployment to use a static IP address. Otherwise, when the installer reboots into the Cloudbuilder.vhdx, the network interfaces are configured with DHCP.

7. Next step, it will start preparing your environment and can see progress as below:

8. Once environment preparation get succeed, will get below page to reboot host machine.

Your host machine is prepared, its time to install ASDK
9. After the host computer successfully boots into the Cloudbuilder.vhdx image, log in using the administrator credentials provide when you prepared the development kit host computer for ASDK Installation. This should be same as local administrator account.
Refer Step No: 6 for reference.
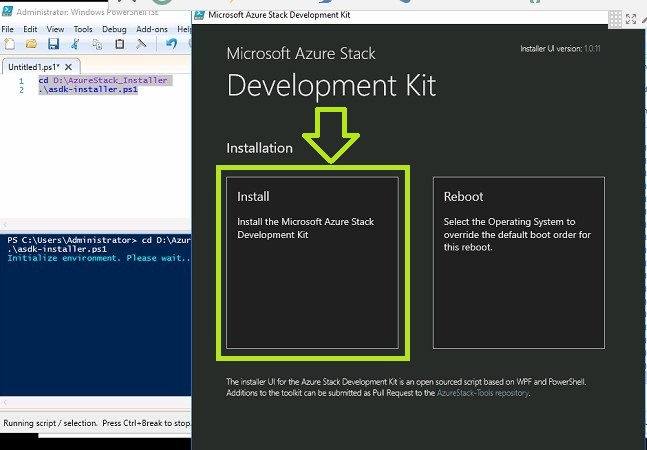
10. Open an Windows PowerShell ISE (Run as Administrator) console and run the <drive letter>\AzureStack_Installer\asdk-installer.ps1 script (which might now be on a different drive than C:\ in the CloudBuilder.vhdx image). Click Install.
Currently, its showing in D: drive.

11. Now need to execute below command in Windows PowerShell ISE (Run as Administrator) and it will open installation page and click install.
Cd d:\AzureStack_Installer
.\asdk-installer.ps1
12. Next Step, it will take you to "Specify Identity providers and Credentials" page
In the Identity Provider Type drop-down box, select Azure Cloud, Azure US Government, Azure China Cloud or AD FS. Under Local Administrator Password type the local administrator password (which must match the current configured local administrator password) in the Password box, and then click Next.
For Local administrator password configuration: Refer Step No: 6 for reference

Note:
ADFS: The default stamp directory service is used as the identity provider. The default account to sign in with is azurestackadmin@azurestack.local, and the password to use is the one you provided as part of setup.
For best results, even if you want to use a disconnected Azure Stack environment using AD FS as the identity provider, it is best to install the ASDK while connected to the internet. That way, the Windows Server 2016 evaluation version included with the development kit installation can be activated at deployment time
Refer Microsoft article to understand more on Identity provider:
Azure China Cloud: Refer below Microsoft article for reference
Azure US Government: Refer below Microsoft article for reference
13. Next Step, will ask you to select Network Adapter which will be use by development kit and then click Next:

14. Select DHCP or static network configuration for the BGPNAT01 virtual machine.
If you wanted to understand more about DHCP or Static Configuration, please refer below Microsoft article:
Note: To generate, Time Server IP, Please open command prompt in host machine and ping time.windows.com

15. On the Verifying network interface card properties page, you'll see a progress bar. When verification is complete, click Next.

16. On Summary page, click Deploy to start ASDK installation on the development kit host computer.

17. If you're performing an Azure AD deployment, you'll be prompted to enter your Azure AD global administrator account credentials a few minutes after setup starts.

18.The deployment process will take a few hours, during which time the host computer will automatically reboot once. If you want to monitor the deployment progress, sign in as azurestack\AzureStackAdmin after the development kit host restarts. When the deployment succeeds, the PowerShell console displays: COMPLETE: Action 'Deployment'.
If you sign in as a local admin after the machine is joined to the domain, you won't see the deployment progress. Do not rerun deployment, instead sign in as azurestack\AzureStackAdmin to validate that it's running.
UserName: AzureStack\AzureStackAdmin
Password: ********(Provided in Step 6)
You will be able to see deployment progress as below:


Once you see "Complete: Action Deployment", you successfully installed ASDK.
Now ASDK has been installed, be ready for post-deployment configuration
19. Once installation get succeed, please run below command to register the PSGallery repository, open an Windows PowerShell (Run as Administrator)
Set-PSRepository -Name "PSGallery" -InstallationPolicy Trusted
20. You can install the latest Azure Stack PowerShell module with or without Internet connectivity to the ASDK host computer:
Please open Windows PowerShell (Run as Administrator) and execute below command one by one With an internet connection from the ASDK host computer.
Run the following PowerShell command to install these modules on your development kit installation:-
Azure Stack 1808 or later:
# Install the AzureRM.Bootstrapper module. Select Yes when prompted to install NuGet.
Install-Module -Name AzureRm.BootStrapper
# Install and import the API Version Profile required by Azure Stack into the current PowerShell session.
Use-AzureRmProfile -Profile 2018-03-01-hybrid -Force
# Install Azure Stack Module Version 1.4.0. If running a pre-1804 version of Azure Stack, change the -RequiredVersion value to 1.2.11.
Install-Module -Name AzureStack -RequiredVersion 1.5.0
Refer below Microsoft article for reference:
Now, its time to Validate ASDK Installation:
a.Log in as AzureStack\AzureStackAdmin on the ASDK host computer.
b.Open Windows PowerShell (Run as Administrator).
c.Run: Enter-PSSession -ComputerName AzS-ERCS01 -ConfigurationName PrivilegedEndpoint
d.Run: Test-AzureStack
The tests take a few minutes to complete. If the installation was successful, the output looks something like:

Once test validation will succeed, now reset the password expiration policy:
22. To make sure that the password for the development kit host doesn't expire before your evaluation period ends, follow these steps after you deploy the ASDK.
Open Windows PowerShell (Run as Administrator)
Set-ADDefaultDomainPasswordPolicy -MaxPasswordAge 180.00:00:00 -Identity azurestack.local
It's time to Register Azure Stack with Azure
23. You can register your Azure Stack Development Kit (ASDK) installation with Azure to download marketplace items from Azure and to set up commerce data reporting back to Microsoft.
the PowerShell language mode must be set to FullLanguageMode on the computer used to register the ASDK with Azure. To verify that the current language mode is set to full, open an Windows PowerShell (Run as Administrator) and run the following PowerShell commands:
$ExecutionContext.SessionState.LanguageMode
24. Before using these instructions to register the ASDK with Azure, ensure that you have installed the Azure Stack PowerShell and downloaded the Azure Stack tools as described in the post-deployment configuration article.
Please refer below MS article for reference:
Download the Azure Stack tools
AzureStack-Tools is a GitHub repository that hosts PowerShell modules for managing and deploying resources to Azure Stack. To obtain these tools, clone the GitHub repository or download the AzureStack-Tools folder by running the following script:
# Change directory to the root directory.
cd \
# Enforce usage of TLSv1.2 to download the Azure Stack tools archive from GitHub
[Net.ServicePointManager]::SecurityProtocol = [Net.SecurityProtocolType]::Tls12
invoke-webrequest `
https://github.com/Azure/AzureStack-Tools/archive/master.zip `
-OutFile master.zip
# Expand the downloaded files.
expand-archive master.zip -DestinationPath . -Force
# Change to the tools directory.
cd AzureStack-Tools-master
If you wanted to do above step manually, please create manually folder in C: drive as per below path
C:\AzureStack-Tools-master\Registration
Once folder will get created, Go to below URL in your web browser and click on "Raw" tab.

Once you will click "Raw" tab, will redirect you to below and copy the content and paste it in notepad and save it as “RegisterWithAzure.psm1” in "C:\AzureStack-Tools-master\Registration" folder.

25. Now execute below command in Windows PowerShell ISE (Run as Administrator)
# Add the Azure cloud subscription environment name.
# Supported environment names are AzureCloud, AzureChinaCloud or AzureUSGovernment depending which Azure subscription you are using.
Add-AzureRmAccount -EnvironmentName "AzureCloud"
# Register the Azure Stack resource provider in your Azure subscription
Register-AzureRmResourceProvider -ProviderNamespace Microsoft.AzureStack
#Import the registration module that was downloaded with the GitHub tools
Import-Module C:\AzureStack-Tools-master\Registration\RegisterWithAzure.psm1
#Register Azure Stack
$AzureContext = Get-AzureRmContext
$CloudAdminCred = Get-Credential -UserName AZURESTACK\CloudAdmin -Message "Enter the credentials to access the privileged endpoint."
Set-AzsRegistration `
-PrivilegedEndpointCredential $CloudAdminCred `
-PrivilegedEndpoint AzS-ERCS01 `
-BillingModel Development `
It will look like something as below:

Now its time to verify registration was successful.
26. Sign in to https://adminportal.local.azurestack.external/ in your ASDK host machine.
UserName: ******@*****.onmicrosoft.com
Password: ******
27. Click Marketplace Management > Add from Azure.

28. If you see a list of items available from Azure, your activation was successful.

Congratulations, ASDK 1808 is ready!!!!


Comments